Spring Boot REST API authentication best practices using JWT
Token-based API authentication with Spring Security and JWT (JSON Web Token)
1. Overview
In this tutorial, I will explain how you can implement production-ready, token-based REST API authentication using JWT (JSON Web Tokens). Further, we will use these tokens to identify our acting user in an HTTP request to our API. For this tutorial we will use MongoDB to persist our user data, you can choose any database of your choice.
2. What is a JWT?
JSON Web Token(JWT) is an encoded string that we will use to identify our user in this case. A JWT consists of three parts separated by a period(.):
Header: It contains a signing algorithm like SHA256.
Payload: It contains our user data.
Signature: To verify the message wasn't changed along the way, making it secure.
Combing all three will make our JWT look something like this xxxxx.yyyyy.zzzzz. To learn more about JWT please visit - https://jwt.io/
3. Project Initialization
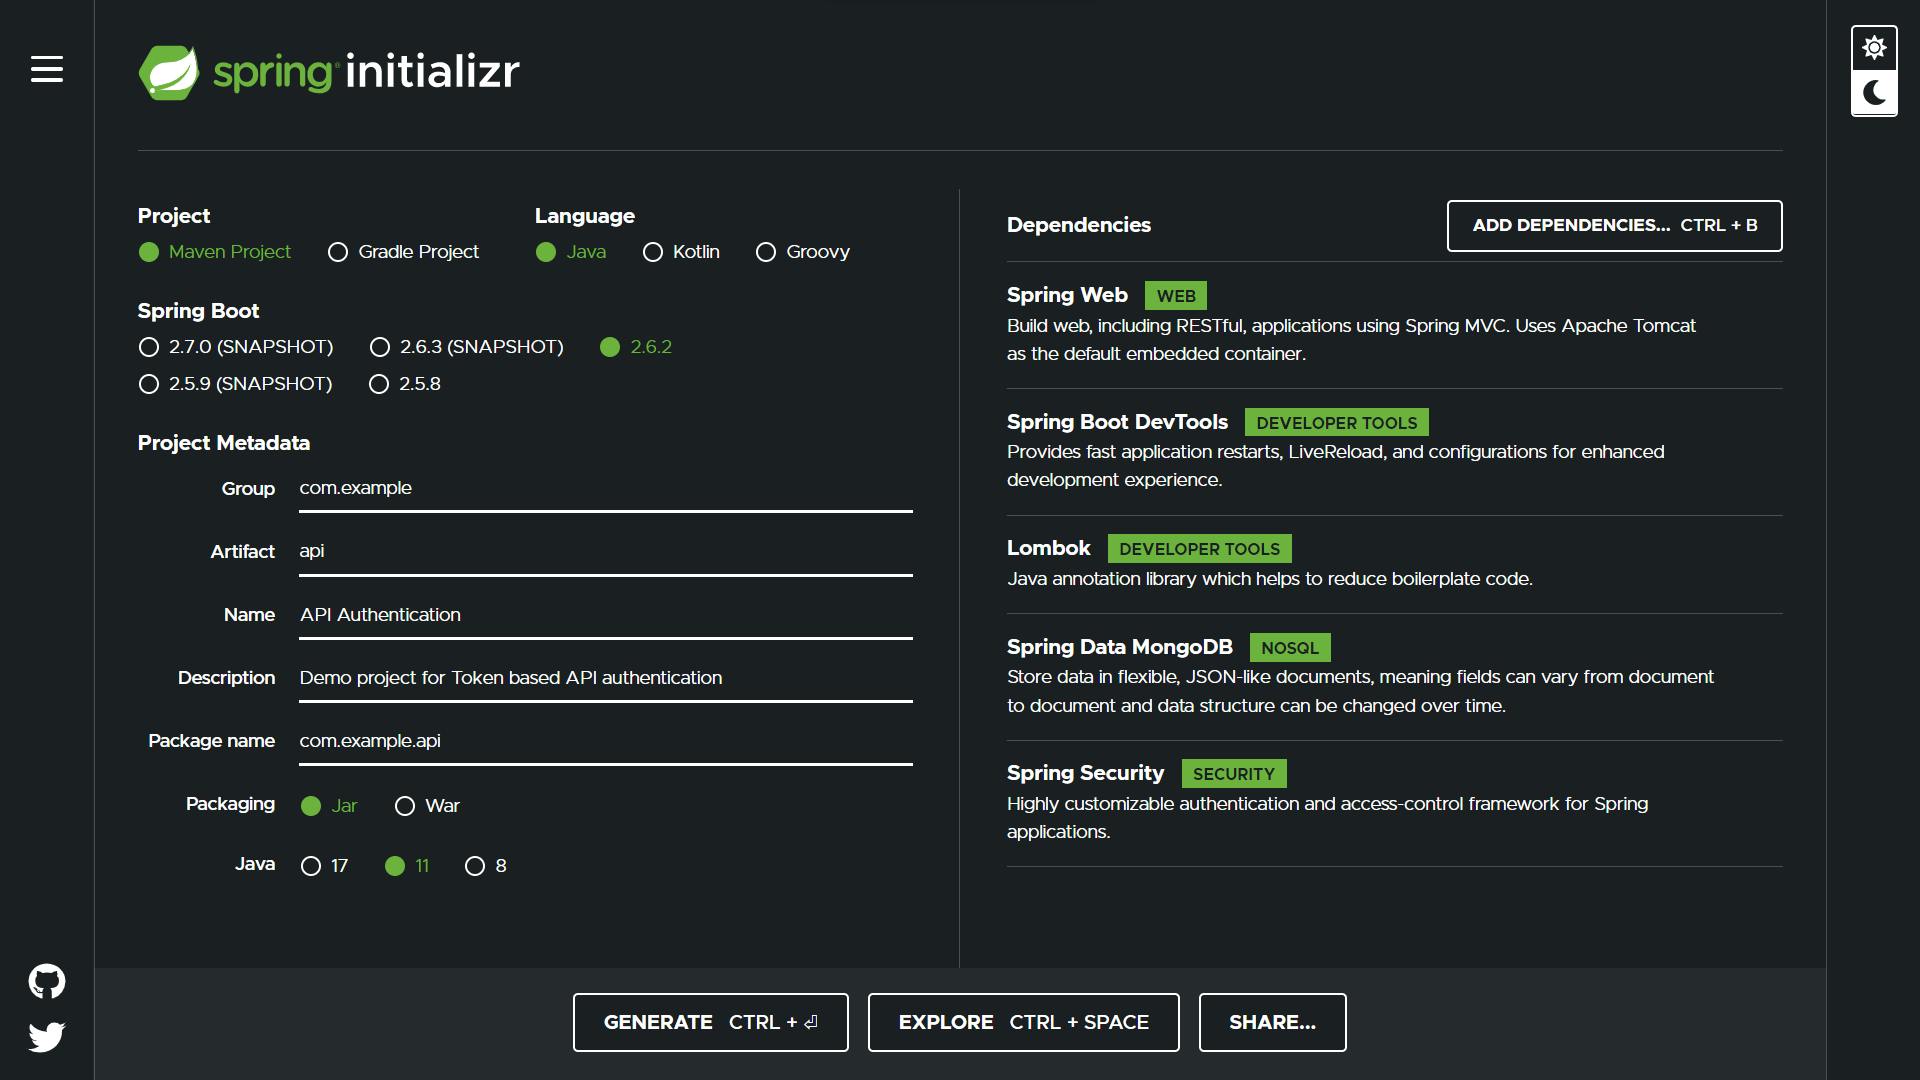
We will start by initializing our Spring Boot project using Spring Initiailizr. For starters I have added 5 dependencies, you can tweak it a little according to your project needs.

Hit generate and import project in your favourite IDE. Also, don't forget to add database properties in the application.properties file.
spring.data.mongodb.database=your_db_name_here
spring.data.mongodb.port=27017
4. Additional Dependencies
You will have to add the following dependencies to use JWT in your project. commons-lang3 is optional, I use it for its various utility classes.
For Maven based projects:
<dependency>
    <groupId>io.jsonwebtoken</groupId>
    <artifactId>jjwt-api</artifactId>
    <version>0.11.2</version>
</dependency><dependency>
    <groupId>io.jsonwebtoken</groupId>
    <artifactId>jjwt-impl</artifactId>
    <version>0.11.2</version>
    <scope>runtime</scope>
</dependency><dependency>
    <groupId>io.jsonwebtoken</groupId>
    <artifactId>jjwt-jackson</artifactId>
    <version>0.11.2</version>
    <scope>runtime</scope>
</dependency><dependency>
    <groupId>org.apache.commons</groupId>
    <artifactId>commons-lang3</artifactId>
    <version>3.12.0</version>
</dependency>
For Gradle based projects:
dependencies {
    implementation 'io.jsonwebtoken:jjwt-api:0.11.2'
    runtimeOnly 'io.jsonwebtoken:jjwt-impl:0.11.2',
             'io.jsonwebtoken:jjwt-jackson:0.11.2',
             'org.apache.commons:commons-lang3:3.0'
}
5. Project Structure
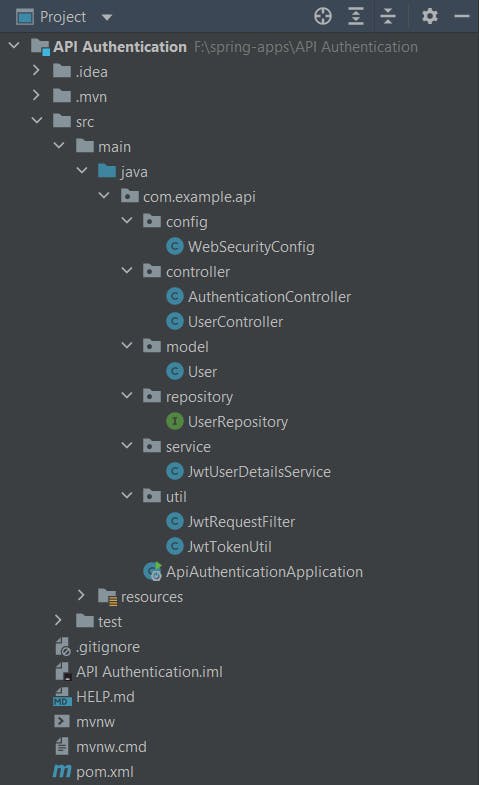
We will follow the MVC pattern, please refer to the following project structure.

6. Configuration
In WebSecurityConfig.java, we will modify default spring security features by extending the WebSecurityConfigurerAdapter class. Here we will define our HTTP request filter and a default response when the user is unauthenticated. It will act as a middleware for all our HTTP requests.
In the above configure(HttpSecurity httpSecurity) method we have defined to permit all requests starting with /auth route that's where we will add our Authentication Controller. If the request is unauthorized our API will throw a 401 error message.

7. Request Filter
In JwtRequestFilter.java we will define our request filter which we mentioned in our API middleware in the previous chapter. For this we will extend OncePerRequestFilter, Spring guarantees that it is executed only once for a given request.
In this doFilterInternal() method we will fetch the JWT token from the request header and process it by validating and obtaining a username from the token's payload. Further, if the token is valid we will fetch the user from the database and add it in SecurityContextHolder, we can use it in any of our services to perform various user-related operations.
In JwtTokenUtil.java we will perform all JWT token related operations such as generating a new token and Validating the given token.
8. Model and Repository
We will use Lombok framework here to quickly create our User.java model. It is completely optional but it is my favourite way of defining a model class. After all, life is too short to write getters and setters.
We will write our UserRepository.java interface and define a method to fetch user details from the username.
9. UserDetailsService
In the JwtUserDetailsService.java class, we will customize the default spring security way of getting user by implementing UserDetailsService interface.
10. Controllers
Last but not least we will define controllers in order to communicate with our API.
AuthenticationController.java will deal with user login and register. In both routes we will generate JWT tokens and send them in response to the user.
Example of response to our register request:

You can save this token from the response in the local storage of your client (Reactive web or Mobile app) and use this token later in protected routes of your API. If we provide invalid credentials to our login request we will get a response with error code 401:

Now it's time to actually use our JWT token to identify users associated with an HTTP request. The following code snippet will help you get the authenticated user anywhere in your project:
Authentication authentication = SecurityContextHolder
                .getContext().getAuthentication();
String username = authentication.getName();
For testing, we will define UserController.java. Here you can get the user we added earlier during the request filter in SecurityContextHolder.
When we will send the newly created JWT token in the Authorization header we will get a proper response as follows:

11. Conclusion
We saw how you can implement token-based authentication for REST API and various amazing frameworks to make life easier.
The complete code for this tutorial is committed in my GitHub repository. Don't forget to give a star to the repository :p
Thank you for reading this post, please give your valuable feedback in the comments section.
